Ok, after all of the Green Glue and sheet rock improvements to the studio I identified a pretty weak spot in the armor where sound was escaping… the entry door to the studio. We could hear a significant volume increase on the external side of the room with the door. Fortunately most of that sound faces the back of my home and not the neighbors so it is mainly a nuisance to anyone in the main house (sorry honey). Inside the studio when it was silent you could hear minor outside noise like a car passing by or the wind chimes blowing. So what goes out can also come in and possibly creep into the recording process.
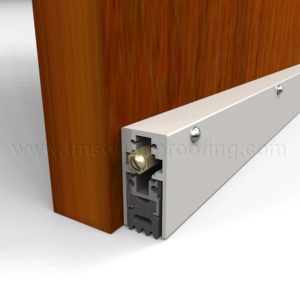
Photo from Trademark Soundproofing and http://www.tmsoundproofing.com
The threshold seal was failing and the seals around the door jamb itself were basic level stuff from a home improvement store. I did some Googling as usual and came across a door threshold seal with a mechanism that pushes the seal down and makes the bottom of the door much more sound proof. It is a Sound Rated Heavy Duty Automatic Door Bottom and it works great. The seal is positioned about 3/8 of an inch above the door jamb and when the door closes, the brass screw that you see in the photo to the right gets pushed and that presses the seal down onto the door threshold with whatever amount of pressure you choose. This greatly reduced the amount of sound escaping from the lower part of the door.
I also added beefier door gaskets from them as well to improve upon the seal that was there. It has a thicker mounting frame and a neoprene gasket with a special flap to press against the door when closed. Since adding a double door configuration would be somewhat of a chore I am hoping this will be enough to settle things down for a while and reduce sound transmission to the neighbors.
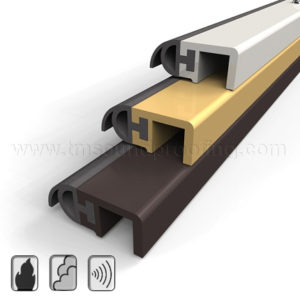
Photo from Trademark Soundproofing and http://www.tmsoundproofing.com
Basic ear testing shows a decent improvement in sound reduction leaking from around the door. I now plan to now add a layer of sound blocking panel to the remaining inside surface area of the door area with Green Glue and add beefier hinges to hold any extra weight. So far the seal is working great and I can leave that door closed all the time and locked and enter through a secondary internal door from the garage. I can always open it when needed to air the room out or move things in and out.
This project took me about 2 total hours to get installed as I made sure to measure precisely for the door opening. I had to do some minor cutting on the left and right seals for length as I didn’t accommodate for the height of the lower door mechanism spanning the width of the door frame. Cutting was done with a simple hack saw. I will run down Clark’s father-in-law Russell (aka my handyman) soon and chat about skinning the door with the Green Glue and another layer of sound blocking material.
Here are some pics:


More to follow…..
More to follow..... Keep On Drumming!!!